Tutorial: How to make an organizer for tools, pencils, etc.

dscn2915

Today’s blog post will teach you how to make an organizer, e.g. for kitchen tools, pencils, stationary, other tools, etc. from a piece of fabric. You can either make it from new fabric or from a garment you wish to upcycle into something useful. 🙂

You will need:

  • a piece of fabric which must be twice as large as the size of your intended organizer (the other half of the fabric will act as lining!); or two different pieces of fabric if you want the lining to be in a different colour or pattern
  • sewing machine
  • thread, needle, scissors, pencil

Instructions:

dscn2882

  1. To determine the size of your organizer, start by placing the tools which you want to store in it on the fabric. Your piece of fabric ought to be a few centimeters longer than the tools. Determine the width of your piece of fabric by adding the intended height of your organizer to both the left and right of your tools.

dscn2887

2. Now cut the top and bottom pieces for your organizer. The height of the small rectangle must be the same as the height you added to the left and right of your tools to the fabric. The width of the small rectangle ought to correspond to the width of your organizer. Cut the strip of fabric double the size again (it will be folded, one side acting as lining) – if you use different fabrics for the shell and lining, cut a rectangle each from the fabric for the shell and for the lining.


dscn2890


3. Now sew the top and bottom squares to the main body of your organizer. Repeat for the lining.

dscn2893

4. Now sew the sides of the small rectangles to the sides of the main body. Repeat with the lining.

dscn2896

5. Put the two ‘containers’ inside each other – the seams must be on the outside!!

dscn2898

6. Sew the top edges of the two ‘containers’ together, leaving a slit open at one side.

dscn2901

7. Turn the fabric inside out so that the seams are now on the inside. Sew the slit shut.

dscn2904

8. Your organizer is now almost finished.

dscn2912

9. For more stability and a better look, sew around the top edge of the seam once more (very close to the edge of the seam is best). Optionally and if you wish, you can insert pieces of cardboard in the size of the sides into your organizer for extra stability before closing the seam.

dscn2906

Close-up of the strengthened seam.

dscn2915

10. Your organizer is now ready.  If you find that the organizer does not hold your tools properly and is rather ‘loose’, you can also add some ribbons to both sides to hold the organizer together.

Zero Waste: How to shop groceries plastic-free

400px-Marketvegetables

Today’s blog post continues our series about a Zero Waste and plastic-free lifestyle, and we will show you how you can shop groceries without using plastic bags or other single-use packaging 🙂 .

The first thing you need will be a variety of cloth bags, e.g. simple bags made of unbleached canvas, in various sizes. You will need some large ones for buying things like potatoes, tomatoes or lettuce or such like (these don’t necessarily need a string to close them, a simple open rectangular bag will do), and some smaller ones with a string for loose bulk food like rice, lentils or beans, etc. You can either buy these ready-made, but you can also easily make them yourself if you are the crafty type 🙂 . For example, if you have old silk or cotton scarves (=very thin fabric) you no longer want or need, you can use those for making bags for bulk supplies. Because of the thin, light flimsy fabric of many scarves, they are ideal for shopping.

Instructions for upcycling a scarf into a grocery bulk bag: Cut up your scarf in the middle so that you have two lengths of rectangular fabric. Fold each rectangle in the middle. Sew the edges together on either side, either with a sewing machine or by hand. If you want to use your bag for small bulk supplies like beans, make a seam at the top end of your bag and pull a string through it. Finally, weigh your bag and write its tare weight (=weight of packaging) directly on the bag so that the shop assistants at the customer desk won’t have to weigh it every time before you go into the store and fill it in the bulk section.

If you want to buy ‘wet’ bulk supplies like e.g. pickles, olives, ‘wet’ cheese like feta, etc., you have several options, depending on whether you have a car or not. If you have a car, you can simply use empty glass jars which you bring along when you go shopping. If you don’t want to have them weighed at the customer desk every time before you fill them, write their weight (=’tare’) on the jar with a permanent marker. However, if you don’t own a car (like us!) and cannot lug around a variety of heavy glass jars when going grocery shopping, you can use lighter metal containers for ‘wet’ bulk supplies: very useful are light steel or aluminum soupcans that are normally used as portable lunch containers, but use can also use cookie tins or even metal tea boxes. 🙂

Happy plastic-free grocery shopping!! 😀

Do you use other containers or bags for buying plastic-free bulk groceries? Let us know in the comments! 🙂

Eco-friendly and zero waste laundry: Soap nuts

DSCN1224

Today’s blog post is about how to do one’s laundry ecologically and without causing any waste. The answer is: using soap nuts.
Soap nuts are 100% natural and non-toxic and can be composted after use. They are usually sold either in a fabric bag or cardboard box, together with a little fabric sachet in which you put about 6-8 nut halves and which you put into the washing machine to wash along with your laundry. Soap nuts are the fruits (or ‘nuts’) of the Sapindus tree, a tree of the lychee family, and have their origin in the Himalaya region, in North India and Nepal, were they were first grown. A 1 kg (2 pound) bag can be bought for as little as £ 10 (€ 12) and this will last for a whole year (!) if you wash at low temperatures and 2 or 3 machine-loads a week. So using soap nuts is also considerably cheaper than using conventional laundry powders. This is because each sachet of soap nuts can be used up to 3 times if you wash at low temperatures. Once you are done with them, you can boil the used nuts and use the resulting soapy liquid to do your dishes or you can use it as fertilizer or pesticide on your house plants or use it as a cleaning liquid– so you can get up to 4 uses out of each sachet of nuts. Soap nuts are also especially recommended if you have allergies or skin conditions since they do not contain any aggressive chemicals.
When using soap nuts, you will not see any foam (or hardly any) and your laundry will smell of nothing. If a ‘fresh’ scent of your laundry is important for you, you will have to add some drops of a natural essential oil, e.g. lavender oil, before the rinse program starts. Soap nuts do their job perfectly well for everyday laundry with mild stains, but if you have items that are heavily stained, you will have to pre-treat the stains with a bar of soap (just rubbing it over the stains) or a stain-remover before throwing them into the machine. Also, you will usually have to pre-treat the greasy stains on shirt collars, especially if you wash at low temperatures (30°C or 40°C) – briefly rubbing a bar of natural soap over the damp collar before putting the shirt into the machine usually does the job.
Since the natural saponins in the soap nuts make fabrics soft in a natural way, a fabric softener is not needed, and your garments and textiles also keep their colours for longer since soap nuts don’t contain any bleaching agents.

Sapindus marginatus
Sapindus marginatus

Zero Waste: Office

DSCN0280

Today’s blog post is about a very important topic, namely waste created in offices, and how to avoid it and what products to use instead.

The first rule to avoid creating unnecessary office waste is to use reusable products with long durability made from natural materials and to use recycled products wherever possible. Unfortunately, eco-friendly products usually aren’t sold in most High Street stores or they offer only a limited product range of eco-friendly products, so your best bet to get hold of eco-friendly office supplies is the Internet. There are a variety of online suppliers specializing in eco-friendly office materials, which you ought to find via a google search.

Here are the dos and don’ts of sustainable office supplies:

1. The first tip ought to be a no-brainer, namely use recycled paper for your printer and for your writing pads, and always use both sides of paper (e.g. use the backside of printed paper for making notes or drafting ideas or mind-maps). Only print out emails and documents if absolutely necessary, and if you print a large number of the same document (e.g. handouts), make a test print first to check for typos.

2. Telephoning: Reuse old paper for taking notes. You can easily make your own note paper by using paper that has been printed on on one side and by cutting it into neat squares. Place these beside your phone.

3. Buy refilled ink cartridges. Brand-new ink cartridges have a very high carbon-footprint since they are made from a huge amount of oil, but if you buy refilled cartridges, less resources are used.

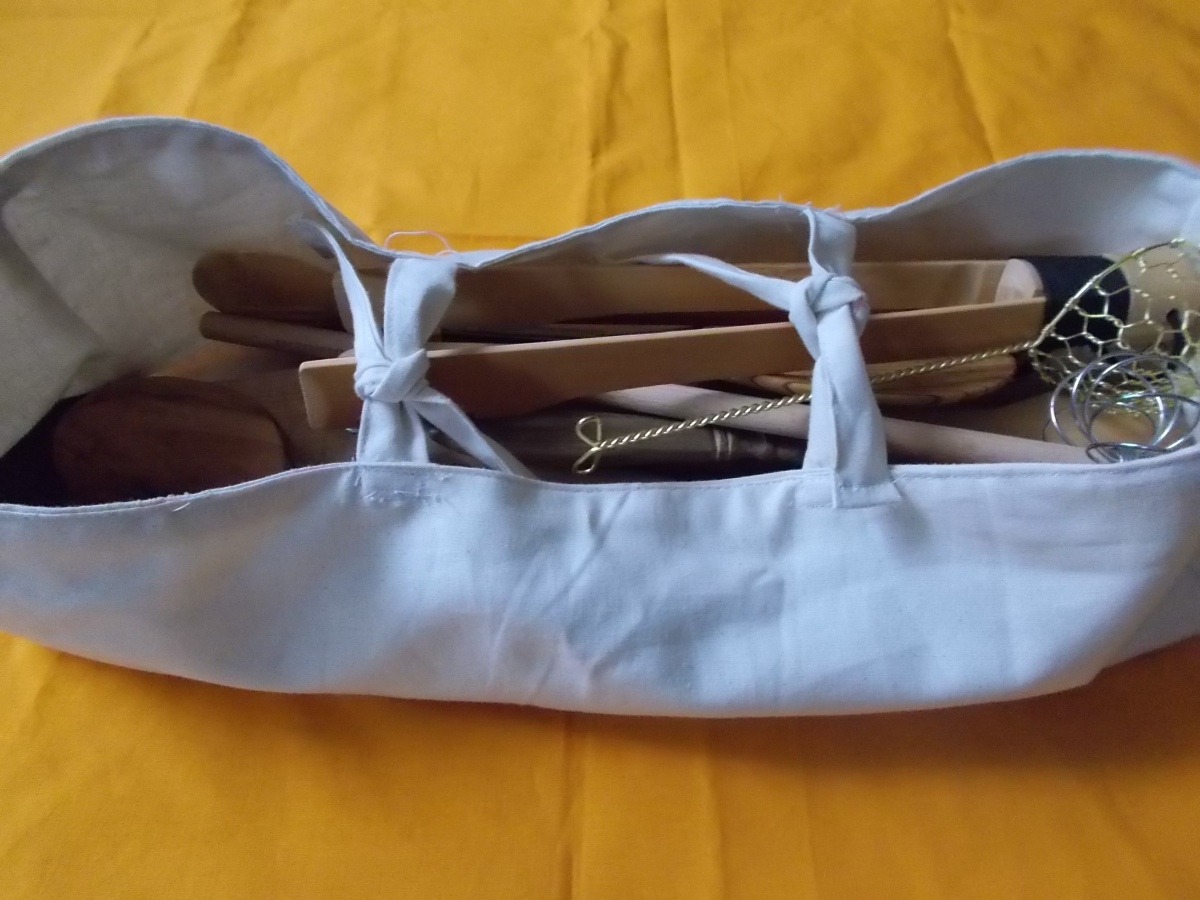
4. Use office supplies made from wood or metal, instead of products made from plastics. There is a large variety of products on the market, as you can see in the photo above. Opt for ballpoint pens made from wood or metal which can be refilled and choose leads made from metal as these can be recycled. Prefer a refillable mechanical pencil, ideally made from wood or metal, over an ‘ordinary’ wooden pencil, as it uses much fewer resources (no need for new trees to be felled!). Buy refills packaged in little glass tubes for your mechanical pencils. If you can, use an ‘old-fashioned’ fountain pen with a converter and fill it with bottled ink. This is the most eco-friendly manner of writing as it doesn’t create any waste from metal refills. Refuse to accept plastic ‘freebies’, like plastic pens commonly given out at conferences, trade fairs and in hotels (apart from being made of plastic, these are usually of low quality and often cannot be refilled or require very expensive ‘special-size’ refills which the free, often ugly pen isn’t worth investing in!)

5. Instead of using toxic plastic textmarkers, use wooden textmarkers, which look like fat colored pencils and are available in bright neon shades. (You can see them in the photo above) These may be more expensive than the toxic variant but they will last for much, much longer.

6. Use pencil sharpeners made from wood or metal, and PVC-free erasers (avoid products containing PVC at all costs, since it is one of the most toxic materials that exist and which releases its toxins over its entire lifetime). Use rulers made from wood.

DSCN0276

7. Avoid using tape made from plastic (often made from PVC!). Instead, use paper tape for parcels, which can be quite sturdy and is often strengthened with integrated string (the brown roll of paper tape in the photo). Or alternatively, tie your parcels with string. Reuse old envelopes, by simply attaching a new label. If you feel embarrassed about doing this, add a small written message like “Reusing envelopes and packaging is not a sign of meanness or stingyness, but a sign of environmental awareness and consciousness”. These messages are sometimes also available as rubberstamps and offered by some companies. Use shredded paper or old newspaper to wrap fragile goods and objects. Use (large) envelopes made from 100% paper, which also have padding made from paper fibres instead of plastic bubble-wrap.. For ordinary letters, use envelopes made from recycled paper. For your private mail, you can also make your own envelopes from magazine pages or from old maps, etc.

8. Instead of using plastic tape, use paper-tape which is water-activated (the white roll of paper tape in the photo). Just cut off a length of tape and dampen its backside with a bit of water – use as you would ‘ordinary’ plastic tape. You can even write on it! 🙂 It is quite sturdy and will serve its purpose just fine.

DSCN0515

9. Instead of using staples, which are too small to be recycled, use paper clips instead. Opt for paperclips made from metal only, without a plastic coating (the plastic coating prevents recycling!). Or use a ‘staple-less’ or ‘staple-free’ stapler (you can see one in the photo above). The staple-free stapler will punch a small hole into your sheets of paper and will hold up to 4 sheets together. Alternatively, punch a hole into your sheets and tie them neatly with a piece of string.

DSCN0516

10. Use office folders made from paper only, i.e. without a plastic coating which prevents them from being recycled. Use paper folders wherever possible instead of plastic folders. You can even make your own by folding a piece of sturdy cardboard in the middle 🙂 and by optionally crafting some side flaps from the same material and gluing them into your folder.

11. Use solvent-free glues and ideally opt for a product for which a large refill-bottle is sold.

12. Computers and media storage: use reusable memory sticks, or external cloud storage, like e.g. Dropbox, to eliminate the need for CDs. If you have to use a CD, opt for rewritable, and therefore reusable, CD-RWs.